Saturday, August 6, 2011

Free Motion Sewing Tutorial - Part 1

 I believe that everyone can learn to sew in free motion

  
So time to turn your dreams into reality.

Sewing in Free Motion can be used to;
  • decorate a quilt
  • sew around the edges of applique
  • create a picture on fabric.
I teach this to pre-teens who believe in their ability to do anything with a sewing machine. They don't hesitate to give it a go and will happily doodle away until they are happy with the results..

To start you need to:
  • Have the correct set up
  • Believe in yourself & take in a few tips
  • Dedicate some regular time to practice

Lets talk about the correct set up

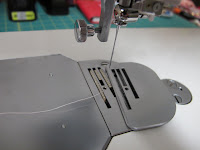
 1. Lower or cover the feed dogs

Your machine should have one of these options


 This is a feet dog cover plate being slid into position. It will sit directly over the feed dogs so that they have no influence on fabric movement.


This is a machine with a slide lever that lowers & raises the feed dogs.
Check your machine manual. They can be in different locations at the back and even under the accessory tray of your machine.     


2. Fit a free motion presser foot to your machine
     (not usually supplied with your machine)

Here is a selection of free motion presser feet
You must use a foot that is designed to fit your machine correctly.

When fitting the foot to your machine ensure that the lever at the top sits above the needle bar. 
This will ensure that every time the needle comes up the foot comes up, and every time the needle goes down the foot goes down. Your stitches will be formed correctly and you will be able to move the fabric smoothly.


3. Fit a suitable needle in the machine
  I prefer to use Schmetz Embroidery needle 90/14 because it is designed to handle thread passing through at high speed without skipping stitches or fraying the thread.  Set your machine to needle down if you can.
 More information about needle types

4. Fit a quilting table attachment to your machine if you have one


Again this is not essential but it sure helps!

The table gives you a large level area on which to work.

They are sold by the folk who sell sewing machines and you need to buy one designed to fit your machine. Lots of people buy these and rarely use them, so ask around, perhaps you can borrow one while you are learning.


4. Find out how to adjust your machine upper thread tension

 The tension dial on your machine is designed to increase or decrease the amount of drag on the thread coming off your spool of cotton. A higher number provides more drag and a lower number less drag. Most machines have tension set between 3 - 5 for regular sewing of 2 layers of regular thickness fabric.

 Please make a note of what your tension dial is set on before you move it! That way you can return it to where it was after you are finished playing.


 This is a picture of a different style of tension dial. It does the same job

 I am telling you this because adjusting your tension will help you to achieve a well formed stitch i.e. one that is not looping on the bottom or pulling on the bottom

Also too tight a tension may result in repeated thread breakage especially when working on a single layer of fabric with stabiliser on the back. I use a tension of about 1.0 for this on my machine.


Now that we have covered the set up I will give you time to get organised before my next tutorial.
Part 2 - Believe in yourself - start sewing in free motion
Bye for now....Linda

Thursday, July 7, 2011

Sew much fun!

Lots of sewing happening here during the school holidays
 And also at Thread & Ginger Patchwork during the holidays
 Just goes to show that too much sewing is never enough
One day I had a class where the youngest was 7 yrs and the oldest 73 yrs. I think we had about 4 generations covered and the lovely thing was that everyone shared an instant bond - their enjoyment of sewing & fabric.


One of my young sewers (7 yrs)
piecing together a snake

I love the concentration


  This is her snake baby beside my 'Slithery Sally'
The pattern is available from Funky Friends Factory and is called Silly Scrap Snake
 Hang on .......its another snake....old blue eyes this time.
I think they're breeding in the basket of fabric scraps
Isn't this little quilt gorgeous. 
Miss E aged 7 yrs worked on this after school once a week for a whole term. When she said that she wanted to make this quilt I was worried about whether she would see it through to the end. So I simplified the elements as much as possible and she showed remarkable determination to follow it through to the finish. Congratulations.

A few more happy faces with their beautiful creative efforts


Lots more photos to come so keep checking the blog.
Bye for now & happy sewing. Linda

Saturday, June 11, 2011

Saviours of the Lost Arts Workshop

Last Sunday Pauline from Funky Friends Factory and Kylie from Voodoo Rabbit held a soft toy making workshop here as part of the Brisbane City Council 'Saviours of the Lost Arts' Program. 


Having fun adding the toy fill to Plattie the platypus


Finished and  just  so gorgeous. Wouldn't you love one of these?


See more of Paulines soft toy patterns at Funky Friends Factory 
and buy the fabric kits and patterns from Voodoo Rabbit

My after school sewing kids saw this photo and were jumping up and down with excitement at the prospect of making one themselves. So I will be teaching Plattie, Baby Rabbit & Silly Scrap Snake  in my school holiday classes.

Isn't this protea beautiful.
I had one just like it in my wedding bouquet in 1989. Seems an unusual choice but I was married in the tropics on a very hot & humid 36 degree summers afternoon (believe me nothing else would have survived)
Thanks Nat & Caryn for a lovely bunch of birthday flowers.

Until next time..............Keep warm  and keep sewing..........Linda

Monday, May 30, 2011

Kids Holiday Sewing Classes


Only 3 to 4 weeks now until the school holidays and I am looking forward to a great couple of weeks meeting & teaching a new generation of sewers.

Each young sewer learns a combination of machine and hand sewing skills tailored to their age and skill set. 

They always get to make something they can take home even in a half day class and most are delighted with their achievemments.

A couple of days allows them to learn more skills and make several small items or one more involved piece.

Classes are limited to 4 to ensure that each child gets individual attention.
To view the class list scroll to the top of this page and on the top right click on
School holiday classes 2011


Sunday, May 15, 2011

Quilting those quilts for Winter

The colder weather has everyone thinking about snuggling under a quilt. Lots of finishing off and quilting going on in classes. 
I thought I would bring you pictures of some of them.
 
This is a very pretty twenty-piece dresden plate block worked in florals on a white printed background. I particularly like the cornerstones and the way Lesley has mixed the colours in the sashing.

  Jeanette started sewing & quilting about 18mths ago. She has just completed 'Charlotte Sometimes' designed by Sarah Fielke from the book Material Obsession Two. I have loved this quilt from the first time I read the book and I am very proud of what Jeanette has achieved. It will be hand quilted.


 Here is Karen stippling a quilt called 'Avalon' which is designed by Kathy Doughty and appears in Material Obsession Book One. It is a great pattern using large squares of feature fabrics with wide sashing. Karen's enthusiasm and love of colour is contagious!

 Maxine made this 'Surfs Up' quilt last year for a grandson and is about to start another. She has quilted in the ditch and around the applique.The boys absolutely love it. We have made it bigger by repeating and reversing some of the motifs. Pattern available from Hot Possum http://www.hotpossum.com/products/Surf%27s-UP-%252d-Lap-Quilt.html 
 We kept the gorgeous edge on Robyn's baby panel by adding a picture frame shaped  piece of backing fabric (orange) and wadding under the scalloped edge and sewing around each scallop. We then trimmed away the excess fabric & wadding and turned the facing right side out. (see top of the photo) After pressing we turned it over to the right side and stitched along the edge line where the white meets the green (bottom of photo). Then it was just a matter of fitting a piece of wadding  & backing into the back and quilting. The backing is turned under and slip stitched along the line of machine stitching visible on the orange fabric at the back.


Some free motion quilting
practice for Robyn

This was an echo of the fabric design

We used 13" squares to practice on. This is the back of the work.

If she does one every day she will be able to join them into a quilt-as-you-go quilt.


This is Lillian's first quilt. We have added a peeper border and  2 other borders to the alphabet panel. Using the walking foot, Lillian has quilted a diagonal grid in the centre and lots of parrallel lines and hearts into the borders. 


I have been working on quilting a couple of baby quilts, making a bag & finishing this jacket. Hopefully next time I show you the jacket it will have sleeves......... Until then get those quilt tops out, layer them up and start quilting.  It is so much fun to finish your quilt.

Cheers Linda

Sunday, April 24, 2011

Quilt as you go - direct join technique

Do you love the idea of quilt-as-you-go
but don't want to add strips between each block.
Then this direct joining technique is for you!

There are 3 key points to remember to make this easy to achieve
1 Several blocks can be joined into a strip of manageable size before quilting

2.  Cut the backing & wadding at least 1" larger than the piece you are quilting
       i.e. 9 1/2" square block requires minimum of 10 1/2" squares of backing & wadding

3.  When quilting you leave at least a 1" margin unquilted around the edges of the piece
 
 I quilted this project as 3 long strips of 4 joined blocks
When the quilting is finished it is time to trim up


First trim the wadding back to to the edge of the block


If you have cut the backing 1" larger than the block you will not need to trim it.

In this photo I had been more generous and needed to trim the backing back to 1/2" along the edge that I would be joining to the next strip


Join the fronts right sides together with a 1/4"seam. 
Ensure the wadding & backing are flipped out of the way.
NB: Remember Key point 3 - 
If you have quilted to the edges of the block it is not
possible to join the fronts in this way!


View from the back while making 1/4" seam


View from the back after pressing seam.

With the edges of the backing still folded out of the way, smooth the wadding into place with one layer on top of the other. Carefully cut away excess wadding with scissors so that the edges of the wadding meet exactly.


Finish the backing by smoothing one side flat over the wadding.
Then with the edge folded under, position the other backing on top so that the folded edge is on top of the seam underneath. Use a ruler if you need.
Pin fold in place and handstitch closed with invisible stitches.
Note: Don't stitch through the wadding if you need to add another piece to this edge.

This quilt and its borders were assembled using the direct joining technique.


Back view of quilt showing machine quilting & handstitched joins.
Please try this technique and vary it to suit your project and your skill level. I often go back and add some lines of quilting across the joins. Any edge that won't be joined to another can be quilted closer to the edge for example the binding edge of the borders in my photo.

This quilt was a UFO for a long time because I chose a brushed cotton backing fabric that frayed badly and was very difficult to work with. On the other hand it is a lovely soft and snuggly finish so I am glad that I perservered.

Tuesday, April 5, 2011

Sewing & Sunshine

Don't look now
I took my sewing machine on holidays and made this
bright & cheerful cushion designed by Australian
Kellie Wulfsohn and called  
First Day of Christmas
This pattern comes with fabulous instructions and tips for free motion machine sewing and inserting a zipper into the back of the cushion. Find this and all of Kellie's patterns at her blogsite

Next I had a scrap quilt to finish
(This one had been lurking in the back of the cupboard for a few years) 
It is a quilt-as-you-go scrap quilt that I had sewed one border on. I'd packed it away and then lost track of where the rest of the backing fabric was. Finally during a clean out I found the backing and set my sights on finishing it off. It has a flannel back so it is really cosy and soft.
Here I am quilting continuously up and down the border strips. Note that I leave 3/4" unstitched where I will attach it to the quilt. For this quilt I used the direct joining technique for the front and hand stitched the back joins.
I attached a scrappy binding and here it is all finished. This one is for Dad to snuggle under this winter.

Sunshine Coast, Queensland , Australia - Holiday Destination
Come on down and enjoy all that Australia has to offer 
Watch the sun rise over the ocean
 Take an early morning beach walk
You can walk for miles & miles on white sand
 Go for a paddle on a tidal lake by the ocean
 find something interesting on the beach
like this shell encrusted rope
 Watch the 'wormers' at work
and in the late afternoon
join the people making the most of the afternoon sunshine at Mooloolabah Beach
or watch the lifesavers do some off duty training at Kawana Beach
I was trying out some special effects with my camera  - black & white with only warm colours
 
 Here is a quick preview of what I am working on next 
it is big, bright and bold
 Bye for now - Linda